Learning how to draw bubble letters is quicker than it looks, because every bubble letter is built the same way: you write a plain stick letter and then puff it out evenly. This guide shows each step with diagrams, then the parts that trip people up: letters with holes such as A, B and R, joining letters into a word, shading, and the five most common mistakes. It is written for kids, teachers and anyone making a poster, and it ends with free practice sheets. Step 5 adds the shadow that turns flat outlines into 3D bubble letters.
Quick answer: To draw bubble letters, write the word in light stick letters, then draw a line around each letter about a sixth of its height away on every side. Round every corner and end, leave a small hole inside A, B, D, O, P, Q and R, erase the stick lines and add a shadow on one side. That is how to draw bubble letters in 5 steps.
Bubble letters started as a graffiti style in New York. The aerosol artist Phase 2 is generally credited with creating them in late 1972, and writers called them “softies”. You need nothing more than a pencil to draw them on paper, and the same method works for one letter on a card or a whole word across a poster.
What you need
You need a pencil, an eraser and a black pen; colors are optional. Each tool has one job:
- A light pencil for the stick letters, pressed softly so the lines erase cleanly.
- A good eraser, because step 4 is all erasing.
- A black fine-tip marker or pen to go over the final outline once you like it.
- Markers or colored pencils for the fill and the shadow.
- Paper with light lines or a grid helps keep letters the same height. Printable paper has graph and lined sheets you can use.
How to draw bubble letters in 5 steps
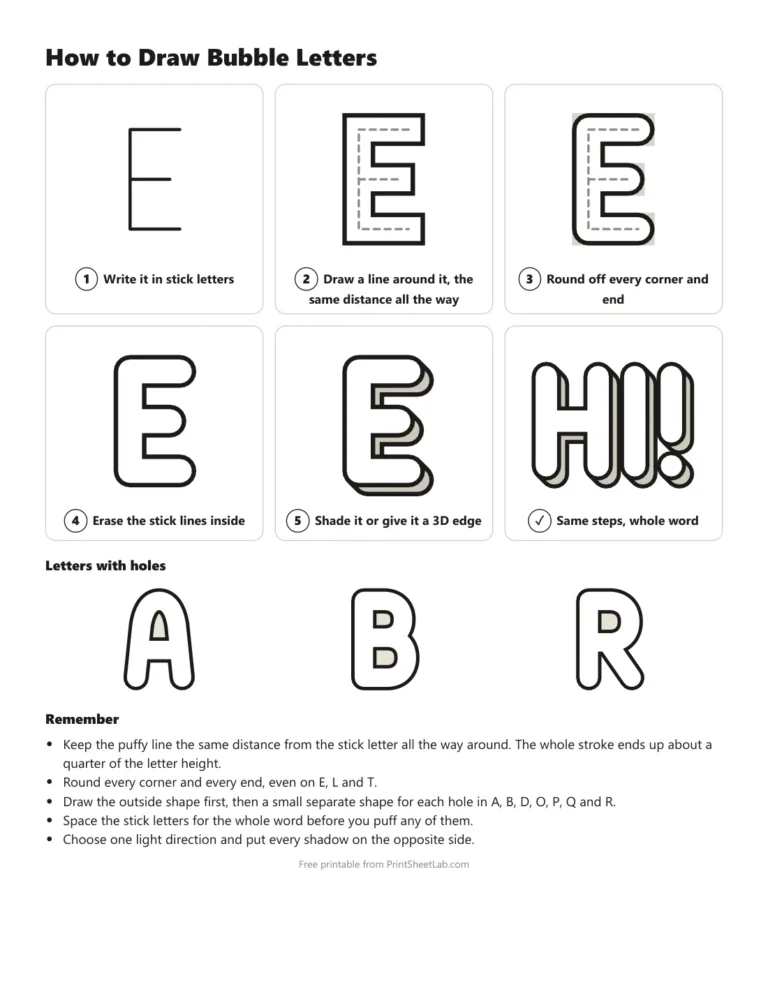
The method is the same for every letter: a stick letter in the middle, an even puffy line around it, then clean-up and shading. Here it is on a capital E, the letter with the most corners.
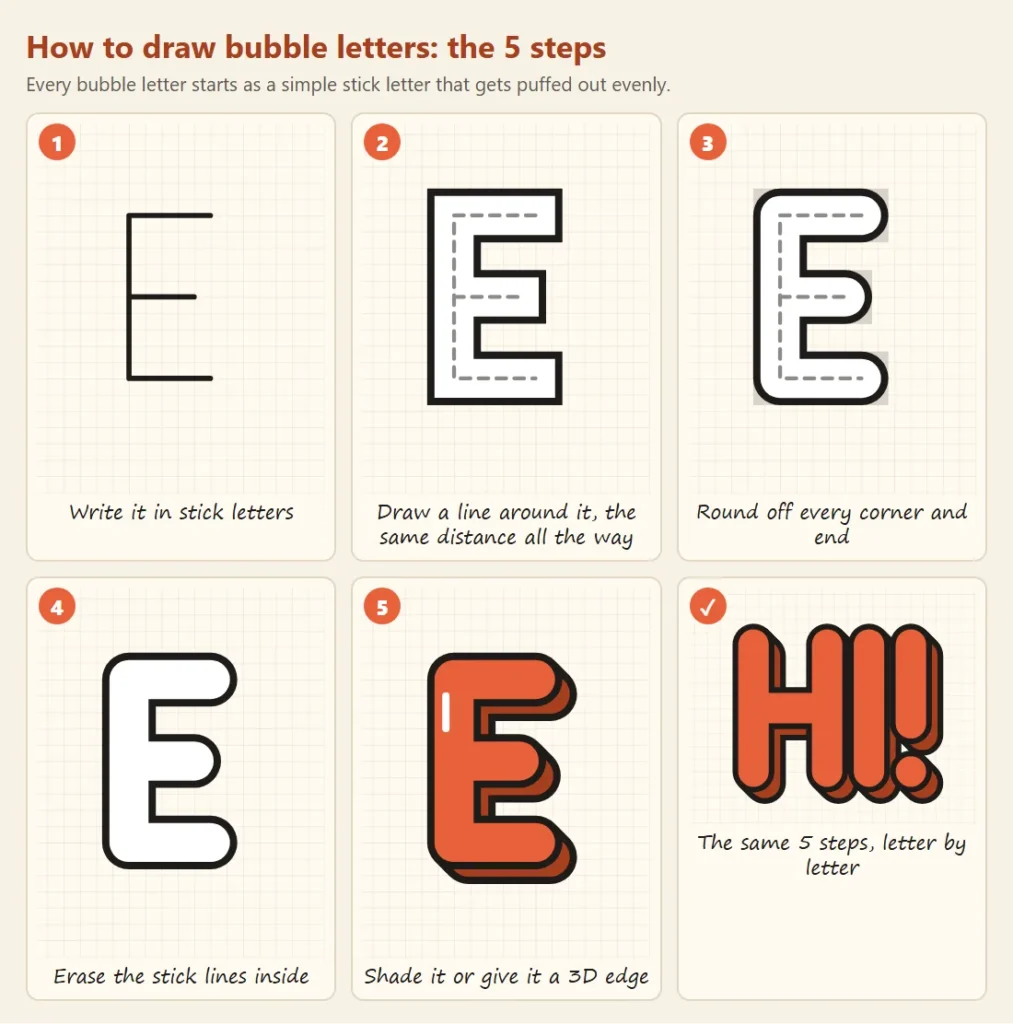
- Write it in stick letters. Draw the letter lightly with single lines, the way you would normally write it. Make it bigger than you think: the finished bubble letter will be about a third taller than the stick letter. If you are not sure where each line starts, the letter formation order guide shows the usual strokes.
- Draw a line around it, the same distance all the way. Trace around the outside of the stick letter, keeping your pencil about a sixth of the stick letter’s height away from it on every side, like a road around a fence. At this stage the corners can be square; the only goal is an even gap.
- Round off every corner and end. Turn each sharp corner into a curve, and turn the end of every stroke into a half circle. This is the step that makes a letter look puffed up instead of blocky.
- Erase the stick lines inside. Rub out the stick letter so only the outline is left. Go over the outline with a black pen first if you want crisp edges, and wait for the ink to dry before erasing.
- Shade it or give it a 3D edge. Pick a side for the light to come from, say the top left, and add a shadow along the bottom and right edges. A short white line near the top left edge looks like a shine.
Tip: draw all of the stick letters for a word first and check the spacing before you puff any of them. Changing a stick letter takes one stroke; changing a finished bubble letter means starting again.
How to do bubble letters with holes: A, B and R
Letters with holes are drawn in two parts: first the outside shape, then a small separate shape inside for each hole. The capitals with holes are A, B, D, O, P, Q and R; in lowercase, a, b, d, e, g, o, p and q have them too.
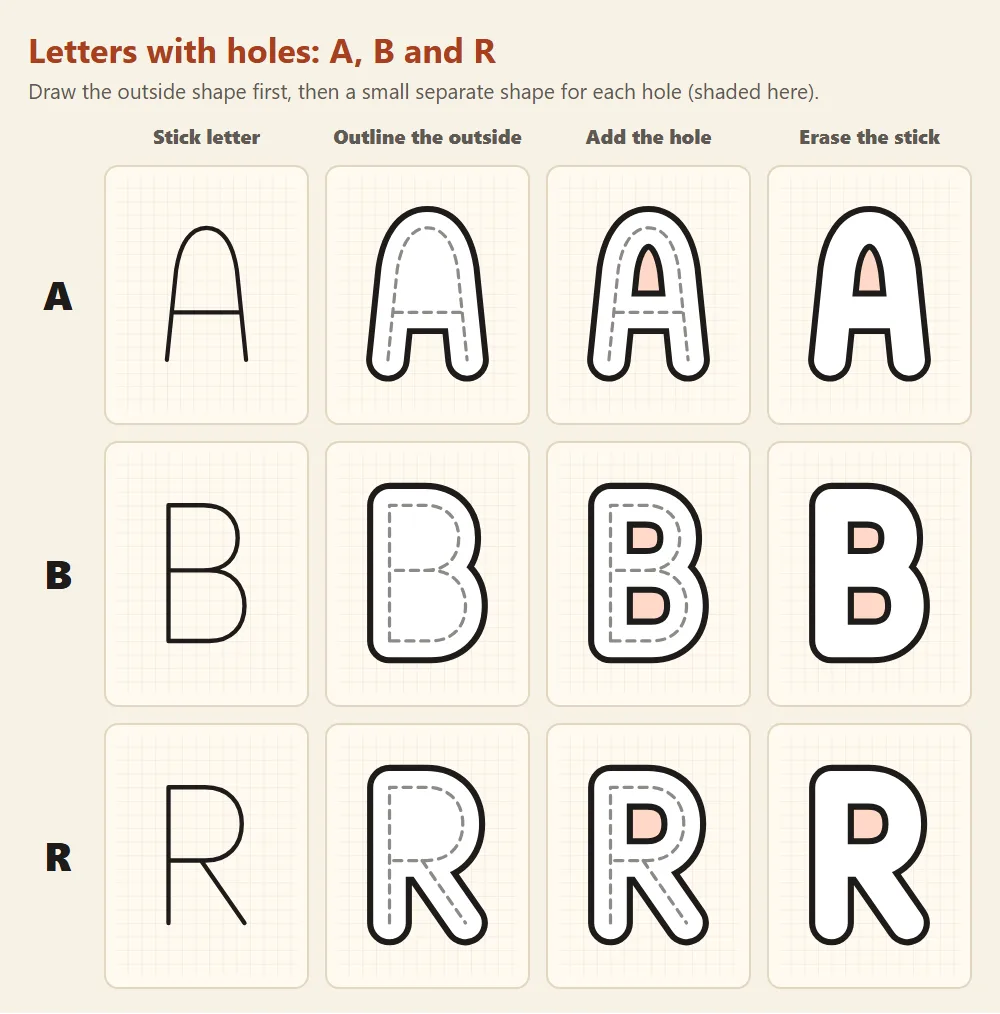
- A: the hole sits above the crossbar and comes out as a narrow rounded triangle. Keep the crossbar a little below the middle, or the hole squeezes shut.
- B: two holes, one in each bump. Make the bottom bump slightly wider than the top so the letter does not look top-heavy, and keep the two holes the same height.
- R: one hole in the top bump, then the leg leaves from the middle of the bump, not from the stem. Starting the leg at the stem crowds the hole.
- O and D: the hole is simply a smaller copy of the outside shape. Keep the ring the same thickness all the way round.
If a hole keeps closing up, the letter is too fat for its size. Either draw a bigger stick letter or keep your outline closer to it.
How do you join bubble letters into a word?
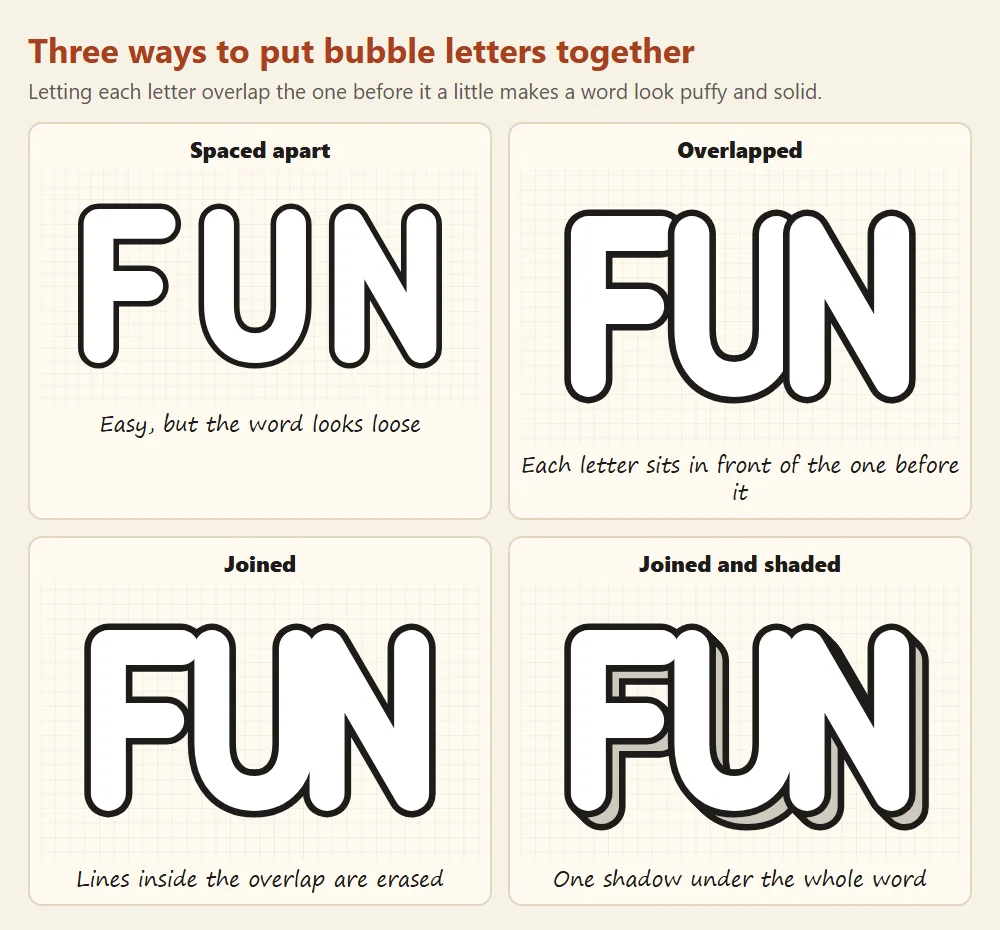
You join bubble letters by letting each one overlap the letter before it a little, then erasing the lines inside the overlap, or letting the front letter cover the one behind it. There are three ways to arrange a word:
| Arrangement | How to draw it | Looks | Best for |
|---|---|---|---|
| Spaced apart | Leave a small gap between the outlines | Neat but loose | Beginners, name tags, single letters to cut out |
| Overlapped | Draw each letter whole, partly covering the one before it | Classic, layered | Posters and notebook covers |
| Joined | Draw both outlines through the overlap, then erase every line inside the shared area | One solid puffy shape | Short words like FUN, WOW, YES, a name |
Joined words work best with letters of the same height and with overlaps that are small. If a thin letter such as I sinks completely into its neighbor, move it apart a little.
Which letters are hardest to draw?
The hardest bubble letters are the ones with diagonals and crowded middles: M, W, K, S and the lowercase e. The fixes are about leaving room.
| Letter | Why it is tricky | What to do |
|---|---|---|
| M and W | The inner V points crowd together | Make the stick letter wide and keep the middle V shallow |
| K | The two arms meet the stem in one spot | Let the lower leg start from the upper arm, not from the stem |
| S | The curves are close, so the gaps close up | Draw a tall, open S with the middle curve slanting |
| G | The bar inside can block the opening | Keep the bar short and stop it at the middle |
| Q | The tail can cover the hole | Start the tail inside the lower right of the O, below the hole |
| e (lowercase) | The hole above the bar is tiny | Draw a bigger e or puff it out less |
| g, j, p, q, y | Tails hang below the line and bump into the next row | Leave extra room below the line |
How to shade bubble letters and make them 3D
Shading bubble letters means choosing where the light comes from and darkening the opposite edges. Most people pick a light from the top left, so every shadow falls on the bottom and right.
- Mark a tiny sun in the corner of the page so you remember the light direction.
- For a drop shadow, draw a copy of each outline shifted a little down and to the right, then fill only the part that shows.
- For a 3D block, connect the corners of the letter to the shifted copy with short straight lines, like the edges of a box. Perspective drawing paper helps if you want the depth to run to a vanishing point.
- Add a white shine: a short curved line near the top left edge of each letter, left uncolored.
| Shading style | What you add | Difficulty |
|---|---|---|
| Drop shadow | A dark copy of the outline, shifted down and right | Easy |
| 3D block | A shadow plus lines that join it to the letter | Medium |
| Shine marks | Short white curves on the light side | Easy |
| Two-tone fill | A darker band of color along the shadow side inside the letter | Medium |
5 common mistakes, before and after
Most bubble letters that look wrong have one of these five problems. Each pair below is drawn the same size so you can compare.
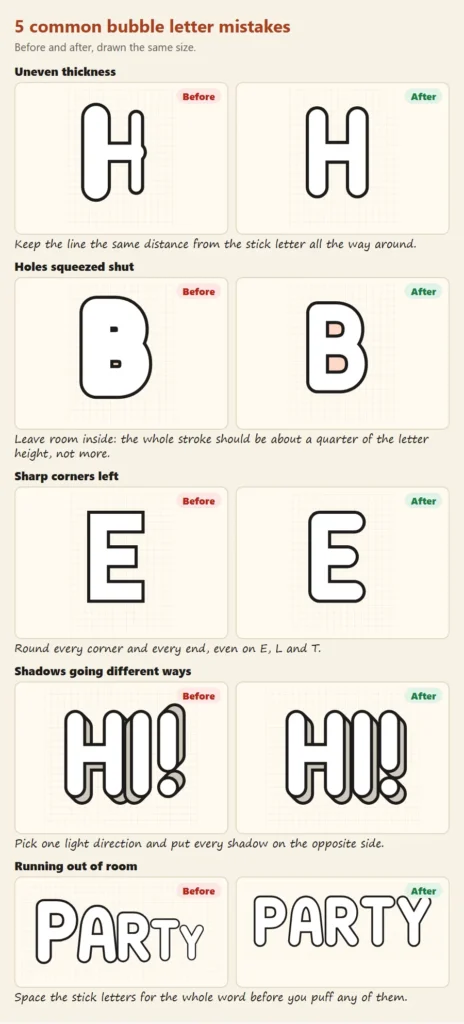
- Uneven thickness. One side of the letter is fat and the other thin. Fix it by keeping the outline the same distance from the stick letter everywhere.
- Holes squeezed shut. The letter is puffed so much that the holes disappear. Stop at about a quarter of the finished letter height in total thickness.
- Sharp corners left. Square corners on E, L or T make the letter look like a block letter. Round every one.
- Shadows going different ways. Each letter seems lit from a different side. Choose one light direction for the whole word.
- Running out of room. The last letters shrink to fit the page. Space the stick letters for the whole word before you start puffing.
Printable bubble letter practice sheets
The practice sheets walk through the method three times for every capital letter. Each row has a gray bubble letter to trace, a dashed stick letter to outline yourself, and an empty box to draw it on your own, with guide lines for the top and bottom.
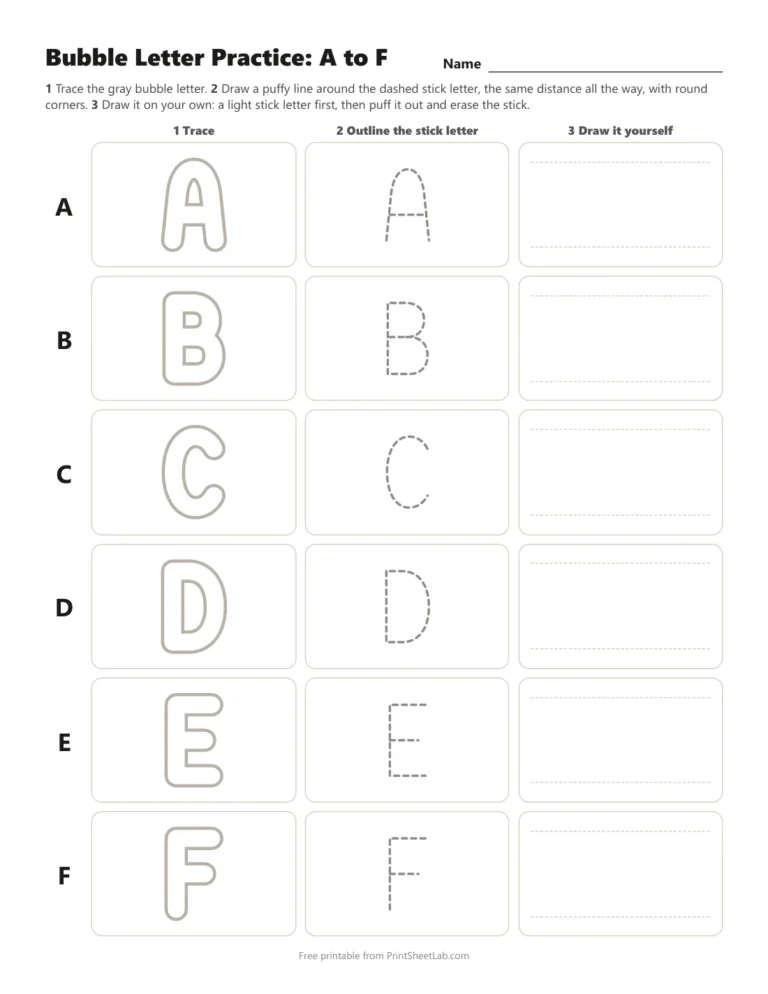
Pages 1 to 4 cover A to X, six letters a page. Page 5 has Y and Z plus the joined words HI, FUN and YES, and page 6 is a planning sheet for drawing your own name in four stages. Print at 100% on US Letter or A4. For the gray tracing letters to stay light, print in normal quality rather than draft.
A one-week practice plan
This plan takes about fifteen minutes a day for five days and ends with a finished name sign. Skip ahead if a day feels easy.
| Day | Practice | Goal |
|---|---|---|
| 1 | Stick letters only: write the alphabet with an even, finger-wide gap between letters | Even size and spacing |
| 2 | Practice sheet pages 1 and 2 (A to L): trace, then outline | An even puffy line |
| 3 | Pages 3 and 4 (M to X), paying attention to the holes in O, P, Q and R | Holes that stay open |
| 4 | Page 5: Y, Z and the joined words | Overlapping and erasing |
| 5 | Page 6: your own name, finished with a shadow and color | A name sign to keep |
Children still learning to form letters will get more from plain letter practice first: letter tracing worksheets and name tracing worksheets build the stick letters that bubble letters start from.
Frequently asked questions
6 quick answers
What is the easiest way to draw a bubble letter?
Write the letter as a simple stick letter, draw a line around it at the same distance all the way, round the corners and erase the stick. That works for every letter and number.
How thick should bubble letters be?
Puff out about a sixth of the stick letter’s height on each side, so the finished stroke is about a quarter of the finished letter’s height. Thicker than that and holes in letters like B and e start to close.
Should I start with capitals or lowercase?
Start with capitals. They all sit between the same two lines, have fewer curves and only seven of them have holes: A, B, D, O, P, Q and R.
Who invented bubble letters?
The graffiti artist Phase 2 is generally credited with originating the style in New York in the early 1970s; it was also called softies. In graffiti, large quick bubble lettering is known as a throw-up.
How do I make my name in bubble letters if I cannot draw?
Type it into the bubble letters generator, print it and trace it, or color it in. After a few tracings, try the name page of the practice sheets.
What pen is best for the outline?
A black fine-tip marker gives the cleanest edge. Go over the pencil outline once, let it dry, then erase the pencil underneath.
Keep going
- Bubble letters generator and printable alphabet: any word in four styles, plus a 26-page poster pack
- Alphabet letters coloring pages for more letter coloring
- Letter formation order for the stick letters underneath
- Printable paper, including graph and lined paper for keeping letters even
Sources
- Phase 2 (artist), Wikipedia (origin of the bubble letter style in late 1972, “softies”)
- Graffiti, Wikipedia (throw-ups: large bubble lettering, filled or hollow)
Did you like this?
Last updated: